So you’ve purchased a crawl space liner, and now need to install it. Please understand we only guarantee the plastic film is of the highest quality. We do not accept responsibility for the construction of the crawl space installation. We simply want to provide tips to guide you through it. One of our past customers made some incredibly informational videos we believe will help you get a better understanding of how to install your liner.
Once the crawl space is cleaned out and water issues are solved, the liner can be installed. The liner material comes folded and rolled on a core. It is easier cut and size the material before you take into the crawl space. After the material is cut to size roll it up with the white side to the inside so that when you roll it out in the crawl space it stays clean.
Start with the walls. Attach the liner 4”-6” inches down from the top of the wall or sill plate with the 2 sided butyl tape (This is to leave a space for pest inspection). Do not remove the release liner on the exposed side until you are ready to attach the liner. Remove the release paper from the butyl tape in about 4’-6’ increments. The material should also be attached with some type of permanent fastener. This can be accomplished using a Hilti or Ramset Powder Fastener or drilling a 5/16” hole and fasten it with Christmas Tree Ratchet Fasteners that press into the holes every 24” – 30”. Install the fasteners thru the material and the butyl tape.
For the floor pieces measure and cut a piece of material wide enough to cover the floor from the wall to the 1st line of piers or supports. Don’t forget to leave enough material to overlap the wall pieces 6”-12”. Roll out and test fit the material. Measure and cut the remaining floor pieces. Again, don’t forget to cut the material long enough to overlap the piece next to it. Roll out and test fit the remaining pieces. Tip-at this point you can take off your boots/shoes to keep the liner clean or use set of disposable shoe covers to keep the material clean.
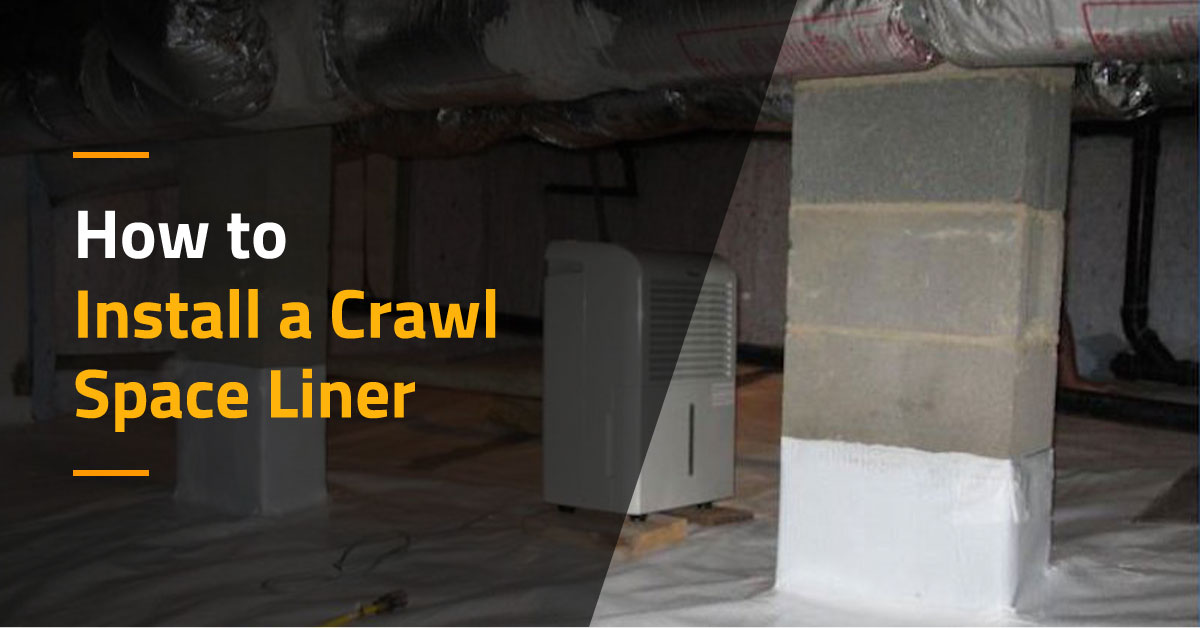
When you get to the piers or support posts you will cut and notch the material to fit tightly around the support. Do this from both sides. Again, don’t forget to leave enough material to overlap the piece next to it. Wrap the piers or support post 6”-12” up from the ground. Use the 4” white Vapor Tape to seal the material tightly around the supports.
Now smooth the material out from the supports to the wall and tape the seams with the 4” white Vapor Tape, making sure to overlap the seams 6”-12”.
This completes the liner installation.
Trusted by Growers, Builders, and Distributors
Americover is the smart source for polyethylene and plastic sheeting. Trusted by contractors and distributors across construction and agriculture industries, our American-made products combine reliability with quality and innovation. We protect and enhance projects from the ground up with reliable solutions, responsiveness, and quick turnarounds.
As an Americover customer, you will receive the personalized support of a dedicated account manager to simplify the ordering process and ensure the best solution for every one of your projects. Our friendly, knowledgeable staff is here to answer your questions and fulfill orders Monday-Friday from 6 a.m. to 6:30 p.m. Pacific Standard Time. If you would like to speak with one of our experts, call us at 760-388-6294 or contact us.